Alerts In Oracle Apps

Oracle Alert

What are Oracle Alerts?
Oracle Alerts monitor your Database information and notify you when the condition that you have specified is found. You can define Alerts in any Oracle application or custom Oracle application. Some applications (Purchasing, for example) supply Alerts that Can simply be activated and used. There are two type of Alerts, Event and Periodic.

Alerts are 2 types of alerts in oracle apps.
1. Periodic Alerts
2. Event based Alerts.

Event Based Alerts: 
These Alerts are fired/triggered based on some change in data in the database.

Periodic Alert:
These Alerts are triggered hourly,daily, weekly, monthly or yearly based on your input.

EX: Employee Birthday can be any calendar day of the year. So we will tell oracle apps 
to check daily once every calender day and see if today is employee's birthday and send email if true.

You need Alert Manager Responsibility to define a new Alert.
Navigate:
Alert Manager -> Alert -> Define

We need to write SQL which satisfies our condition and also to fetch required details.

SELECT global_name, 
               date_of_birth,
               email_address into &emp_name,
               &dob, 
               &emp_email
FROM    per_all_people_f
WHERE trunc(sysdate) between effective_start_date and effective_end_date
     AND to_char(to_date(date_of_birth),'dd') = to_char(to_date(sysdate),'dd')
     AND to_char(to_date(date_of_birth),'mm') = to_char(to_date(sysdate),'mm');

Note:
  • Your periodic alert Select statement must include an INTO clause that contains one output for each column selected by your Select statement.
  •  Identify any inputs with a colon before the name, for example, :INPUT_NAME.
  • Identify any outputs with an ampersand (&) before the name, for example, &OUTPUT_NAME.
  • Do not use set operators in your Select statement.
  • You can use PL/SQL functions in your Select statement to fetch complex business logic.


  • §  Enter the name of the application that will own the alert
    §  Enter a suitable Name of the alert (up to 50 characters), and 
        give it a meaningful description (up to 240 characters).
    §  Select a frequency for your periodic alert. You can choose from nine frequency options:
    1.    On Demand
    2.    On Day of the Month
    3.    On Day of the Week
    4.    Every N Calendar Days
    5.    Every Day
    6.    Every Other Day
    7.    Every N Business Days
    8.    Every Business Day
    9.    Every Other Business Day

    §  Choose ‘On Demand’ frequency when you are developing a periodic alert so that you can test your alert at any time you want. When you will sure that the alert is working fine, then you can change the frequency as per business need.
    §  Depending on the frequency you choose in the previous step, the Start Time and End Time fields become enabled.  You may also specify the number of times within a 24-hour period that Oracle Alert checks your alert.
    §  Specify a value in the Keep _ Days field to indicate the number of days of exceptions, actions, and response actions history you want to keep for this alert.
    §  Specify a value in the End Date field if you want to disable your alert by a certain date.
    §  Enter a SQL Select statement that retrieves all the data your alert needs to perform the actions you plan to define.
Check the SQL for syntax using "verify" button.

If any row that matches condition, it is called exception in Alert.
So when you click "run" button, it will display the number of exceptions occurred.


Next step is to define action if condition matches.
Don't forget to select action level of type "Detail". 
This is because action should be performed once for every Alert Exception.


Then click on "Action Details" button and define the email message as shown below.


We also need "Action Sets" and attach the action which we just created.


Now we have to test this Alert:

Go to Alert Manager -> Request -> Check, and schedule the Alert to run it sometime after current time.
It will submit a concurrent program. [In this example CP Name is "Birthday Wishes E-mail Alert (Check Periodic Alert)"]
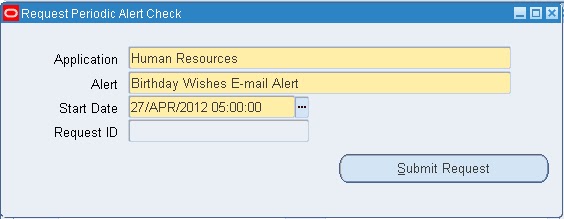


Once concurrent program is successfully ran, we can verify the number of exception from
Alert Manager -> History and query for alert.


Create Auto Customization Criteria OAF Search Page


Create Auto Customization Criteria OAF Search Page


1. Create a New Workspace and Project
Right click Workspaces and click create new OAworkspace and name it as PRajkumarCustSearch. Automatically a new OA Project will also be created. Name the project as CustSearchDemo and package as prajkumar.oracle.apps.fnd.custsearchdemo

2. Create a New Application Module (AM)
Right Click on CustSearchDemo > New > ADF Business Components > Application Module
Name -- CustSearchAM
Package -- prajkumar.oracle.apps.fnd.custsearchdemo.server

3. Enable Passivation for the Root UI Application Module (AM)
Right Click on CustSearchAM > Edit SearchAM > Custom Properties >
Name – RETENTION_LEVEL
Value – MANAGE_STATE
Click add > Apply > OK

4. Create Test Table and insert data some data in it (For Testing Purpose)

CREATE TABLE xx_custsearch_demo
(   -- ---------------------
    -- Data Columns
    -- ---------------------
    column1                  VARCHAR2(100),
    column2                  VARCHAR2(100),
    column3                  VARCHAR2(100),
    column4                  VARCHAR2(100),
    -- ---------------------
    -- Who Columns
    -- ---------------------
    last_update_date    DATE         NOT NULL,
    last_updated_by     NUMBER   NOT NULL,
    creation_date          DATE         NOT NULL,
    created_by               NUMBER   NOT NULL,
    last_update_login   NUMBER
 );

INSERT INTO xx_custsearch_demo VALUES('v1','v2','v3','v4',SYSDATE,0,SYSDATE,0,0);
INSERT INTO xx_custsearch_demo VALUES('v1','v3','v4','v5',SYSDATE,0,SYSDATE,0,0);
INSERT INTO xx_custsearch_demo VALUES('v2','v3','v4','v5',SYSDATE,0,SYSDATE,0,0);
INSERT INTO xx_custsearch_demo VALUES('v3','v4','v5','v6',SYSDATE,0,SYSDATE,0,0); 
Now we have 4 records in our custom table

5. Create a New Entity Object (EO)
Right click on SearchDemo > New > ADF Business Components > Entity Object
Name – CustSearchEO
Package -- prajkumar.oracle.apps.fnd.custsearchdemo.schema.server
Database Objects -- XX_CUSTSEARCH_DEMO

Note – By default ROWID will be the primary key if we will not make any column to be primary key


Check the Accessors, Create Method, Validation Method and Remove Method

6. Create a New View Object (VO)
Right click on CustSearchDemo > New > ADF Business Components > View Object
Name -- CustSearchVO
Package -- prajkumar.oracle.apps.fnd.custsearchdemo.server

In Step2 in Entity Page select CustSearchEO and shuttle them to selected list

In Step3 in Attributes Window select columns Column1, Column2, Column3, Column4, and shuttle them to selected list

In Java page deselect Generate Java file for View Object Class: CustSearchVOImpl and Select Generate Java File for View Row Class: CustSearchVORowImpl

7. Add Your View Object to Root UI Application Module
Select Right click on CustSearchAM > Application Modules > Data Model
Select CustSearchVO and shuttle to Data Model list

8. Create a New Page
Right click on CustSearchDemo > New > Web Tier > OA Components > Page
Name -- CustSearchPG
Package -- prajkumar.oracle.apps.fnd.custsearchdemo.webui

9. Select the CustSearchPG and go to the strcuture pane where a default region has been created

10. Select region1 and set the following properties:
ID -- PageLayoutRN
Region Style -- PageLayout
AM Definition -- prajkumar.oracle.apps.fnd.custsearchdemo.server.CustSearchAM
Window Title – AutoCustomize Search Page Window
Title – AutoCustomization Search Page
Auto Footer -- True

11. Add a Query Bean to Your Page
Right click on PageLayoutRN > New > Region
Select new region region1 and set following properties
ID – QueryRN
Region Style – query
Construction Mode – autoCustomizationCriteria
Include Simple Panel – False
Include Views Panel – False
Include Advanced Panel – False

12. Create a New Region of style table
Right Click on QueryRN > New > Region Using WizardApplication Module – prajkumar.oracle.apps.fnd.custsearchdemo.server.CustSearchAM
Available View Usages – CustSearchVO1

In Step2 in Region Properties set following properties
Region ID – CustSearchTable
Region Style – Table

In Step3 in View Attributes shuttle all the items (Column1, Column2, Column3, Column4) available in “Available View Attributes” to Selected View Attributes:
In Step4 in Region Items page set style to “messageStyledText” for all items

13. Select CustSearchTable in Structure Panel and set property Width to 100%

14. Include Simple Search Panel
Right Click on QueryRN > New > simpleSearchPanel
Automatically region2 (header Region) and region1 (MessageComponentLayout Region) createdSet Following Properties for region2
Id – SimpleSearchHeader
Text -- Simple Search

15. Now right click on message Component Layout Region (SimpleSearchMappings) and create two message text input beans and set the below properties to each

Message TextInputBean1
Id – SearchColumn1
Search Allowed – True
Data Type – VARCHAR2
Maximum Length –
CSS Class – OraFieldText
Prompt – Column1

Message TextInputBean2
Id – SearchColumn2
Search Allowed -- True
Data Type – VARCHAR2
Maximum Length – 100
CSS Class – OraFieldText
Prompt – Column2

16. Now Right Click on query Components and create simple Search Mappings. Then automatically SimpleSearchMappings and QueryCriteriaMap1 created

17.  Now select the QueryCriteriaMap1 and set the below properties
Id – SearchColumn1Map
Search Item – SearchColumn1
Result Item – Column1

18. Now again right click on simpleSearchMappings -> New -> queryCriteriaMap, and then set the below properties
Id – SearchColumn2Map
Search Item – SearchColumn2
Result Item – Column2

19. Congratulation you have successfully finished Auto Customization Search page. Run Your CustSearchPG page and Test Your Work


Create Data Entry OAF Page


Create Data Entry OAF Page


1. Create a New Workspace and Project
Right click Workspaces and click create new OAworkspace and name it as PRajkumarInsert. Automatically a new OA Project is also created. Name the project as InsertDemo and package as prajkumar.oracle.apps.fnd.insertdemo

2. Create a New Application Module (AM)
Right Click on InsertDemo > New > ADF Business Components > Application Module
Name -- InsertAM
Package -- prajkumar.oracle.apps.fnd.insertdemo.server

3. Enable Passivation for the Root UI Application Module (AM)
Right Click on InsertAM > Edit InsertAM > Custom Properties >
Name – RETENTION_LEVEL
Value – MANAGE_STATE
Click add > Apply > OK

4. Create Test Table in which we will insert data (For Testing Purpose)
CREATE TABLE xx_insert_demo
(        -- --------------------- 
         -- Data Columns  
         -- --------------------- 
         column1                           VARCHAR2(100), 
         column2                           VARCHAR2(100), 
         -- ---------------------             
         -- Who Columns              
         -- ---------------------            
         last_update_date          DATE            NOT NULL, 
         last_updated_by           NUMBER     NOT NULL, 
         creation_date                 DATE            NOT NULL, 
         created_by                      NUMBER     NOT NULL, 
         last_update_login        NUMBER 
); 

5. Create a New Entity Object (EO)
Right click on InsertDemo > New > ADF Business Components > Entity Object
Name – InsertEO
Package -- prajkumar.oracle.apps.fnd.insertdemo.schema.server
Database Objects -- XX_INSERT_DEMO

Note – By default ROWID will be the primary key if we will not make any column to be primary key.
Check the Accessors, Create Method, Validation Method and Remove Method

6. Create a New View Object (VO)
Right click on InsertDemo > New > ADF Business Components > View Object
Name -- InsertVO
Package -- prajkumar.oracle.apps.fnd.insertdemo.server
In Step2 in Entity Page select InsertEO and shuttle them to selected list
In Step3 in Attributes Window select columns Column1, Column2 and shuttle them to selected list
In Java page deselect Generate Java file for View Object Class: InsertVOImpl and Select Generate Java File for View Row Class: InsertVORowImpl

7. Add Your View Object to Root UI Application Module
Right click on InsertAM > Edit InsertAM > Data Model >
Select InsertVO in Available View Objects list and shuttle to Data Model list

8. Create a New Page
Right click on InsertDemo > New > Web Tier > OA Components > Page
Name -- InsertPG
Package -- prajkumar.oracle.apps.fnd.insertdemo.webui

9. Select the InsertPG and go to the strcuture pane where a default region has been created

10. Select region1 and set the following properties:
ID -- PageLayoutRN
Region Style -- PageLayout
AM Definition -- prajkumar.oracle.apps.fnd.insertdemo.server.InsertAM
Window Title -- Date Entry Page Window
Title -- Data Entry Page
Auto Footer -- True

11. Right click PageLayoutRN > New > Region
ID -- MainRN
Region Style -- defaultSingleColumn

12. Create Text Input Items
Right click on MainRN > New > Item
Set following properties for New Item
ID -- COLUMN1
Item Style -- messageTextInput
Maximum Length -- 100
Length -- 20
Prompt -- Column1
View Instance -- InsertVO1
View Attribute -- Column1

Again Right click on MainRN > New > Item
Set following properties for New Item 
ID -- COLUMN2
Item Style -- messageTextInput
Maximum Length -- 100
Length -- 20
Prompt -- Column2
View Instance -- InsertVO1
View Attribute – Column2

13. Add Apply and Cancel Buttons
Right click on PageLayoutRN > New > Region
         ID -- PageButtons
         Region Style -- pageButtonBar

Right click on PageButtons > New > Item
ID -- Cancel
Item Style -- submitButton
Attribute Set -- /oracle/apps/fnd/attributesets/Buttons/Cancel
Disable Server Side Validation -- True
Prompt -- Cancel
Warm About Changes -- False
Additional Text – Select to cancel this transaction.

Right click on PageButtons > New > Item
ID -- Apply
Item Style -- submitButton
Attribute Set -- /oracle/apps/fnd/attributesets/Buttons/Apply
Prompt -- Apply
Additional Text – Select to save this transaction.

14. Implement Row Initialization (Create a View Object Row)
Add createRecord method to your InsertAMImpl class
import oracle.jbo.Row;
import oracle.apps.fnd.framework.OAViewObject;
...
  
public void createRecord()
{
  OAViewObject vo = (OAViewObject)getInsertVO1();
 
  if (!vo.isPreparedForExecution()) 
  { 
 vo.executeQuery(); 
  }
 
  Row row = vo.createRow();
  vo.insertRow(row);
  row.setNewRowState(Row.STATUS_INITIALIZED);
} 
 
15. Create Controller for Page  
PageLayoutRN > Set New Controller >
Package Name: prajkumar.oracle.apps.fnd.insertdemo.webui
Class Name: InsertCO

16. Add Create Page Initialization to your Controller
Add following code to your processRequest()
import oracle.apps.fnd.framework.OAApplicationModule;
...
 
public void processRequest(OAPageContext pageContext,OAWebBean webBean)
{
  super.processRequest(pageContext, webBean);  
 
  if (!pageContext.isFormSubmission())
  {
   OAApplicationModule am = pageContext.getApplicationModule(webBean);
   am.invokeMethod("createRecord", null);
  }  
}


17. Add below method in InsertAMImpl Class to handle Apply Button action
import oracle.jbo.Transaction;
...
 
public void apply()
{
  getTransaction().commit();
}

 
18. Add below Logic in InsertCO to handle Apply Button
Add following code to your processFormRequest()
import oracle.jbo.domain.Number; 
import oracle.apps.fnd.common.MessageToken;
import oracle.apps.fnd.framework.OAException;
import oracle.apps.fnd.framework.OAViewObject;
import oracle.apps.fnd.framework.webui.OAWebBeanConstants;
...

public void processFormRequest(OAPageContext pageContext, OAWebBean webBean)
{super.processFormRequest(pageContext, webBean);
 OAApplicationModule am = pageContext.getApplicationModule(webBean);
 // Pressing the "Apply" button means the transaction should be
 // validated and committed.
              
 if (pageContext.getParameter("Apply") != null) 
 {
  OAViewObject vo = (OAViewObject)am.findViewObject("InsertVO1");
  String column1 = (String)vo.getCurrentRow().getAttribute("Column1");
  String column2 = (String)vo.getCurrentRow().getAttribute("Column2");
                     
  am.invokeMethod("apply");
                     
  // Create a FND Message with name "TEST_CREATE_CONFIRM" with two 
  // tokens                   
  MessageToken[] tokens = { new MessageToken("COLUMN1", column1),
                            new MessageToken("COLUMN2", column2) 
                          };
 
  OAException confirmMessage = new OAException( "FND",
                                 "TEST_CREATE_CONFIRM", tokens,
                                 OAException.CONFIRMATION, null);
   
  pageContext.putDialogMessage(confirmMessage);
  pageContext.forwardImmediately(
   "OA.jsp?page=/prajkumar/oracle/apps/fnd/insertdemo/webui/InsertPG",
    null, OAWebBeanConstants.KEEP_MENU_CONTEXT,
    null,
    null,
    true, // retain AM
    OAWebBeanConstants.ADD_BREAD_CRUMB_NO);
 }
}


19. Congratulations you have successfully created data insert page. Run InsertPG page to test Your Work


How to find all cancel Requisitions

SELECT prha . *   FROM po_Requisition_headers_all prha , po_action_history pah   WHERE      1 = 1        AND pah . object_id ...